ESP8266 INTERFACING WITH ARDUINO UNO
OVERVIEW
This is simple article on how to connect ESP8266 chip with Arduino Micro controller development board. The ESP8266 is a low-cost Wi-Fi microchip with full TCP/IP stack and microcontroller capability produced by Chinese manufacturer Espressif Systems. The low price and easy to use features made ESP8266 popular among hardware hackers. It has two programmable GPIO pins and one RX and TX pins each.
Connecting ESP8266 adds WiFi capability to Arduino, So that we can control Arduino over WiFi, build web server etc. ESP8266 has its on micro controller itself, but with limited capabilities. Now, Let's look at how to connect this with Arduino UNO.
COMPONENTS
- ARTDUINO UNO
- ESP8266
- BREADBOARD
- JUMPER WIRES
- 12V AC ADAPTER
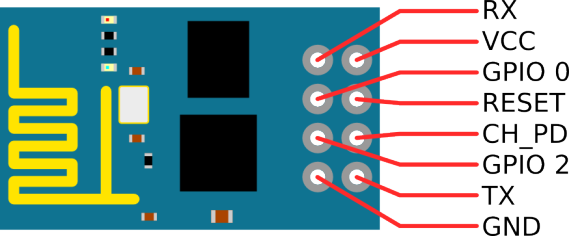
ESP8266 PINOUT DIAGRAM

WIRING
UNO --- ESP8266
RX ----- RX
TX ----- TX
GND --- GND
3.3V --- VCC
3.3V --- CH_PD
STEPS
- Do connection as above.
- Open serial monitor in Arduino IDE and choose CR & NL and 9600 as baud rate.
- Type AT in serial monitor and send. It will return OK on success.
- Now try some Example codes given in Arduino IDE and hack around it. Happy hacking :)
If you have any questions, please comment below.
REFERENCE